The indispensable halligan
By Nathan Pocock
FeaturesGet to know the subtle differences between halligans that will ultimately affect performance
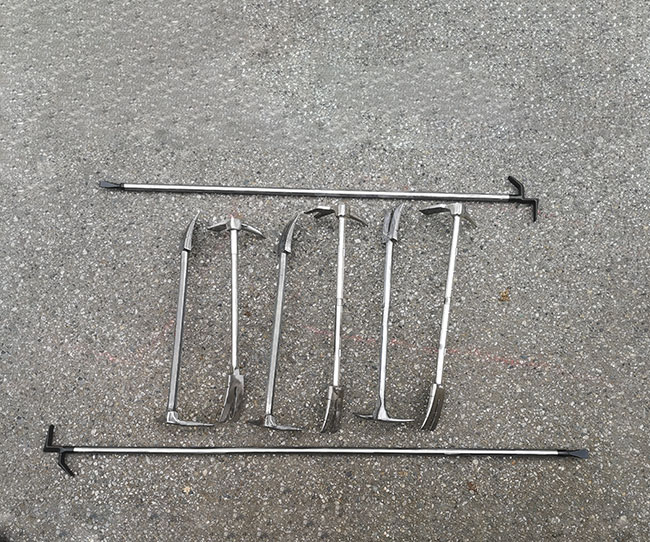 There are many different halligans on the market, and individual preferences play a large role in selection. Photo credit: Nathan Pocock
 Any master of their craft will tell you about the importance of a good tool. A carpenter will not choose just any hammer for their tool belt, they will purchase a good hammer to increase personal comfort and efficiency. Not that the inexpensive hammer will not pound nails, but the speed, efficiency and comfort of the nicer hammer is unmistakable.
The trade of fire fighting shares a likeness with carpentry in its need for good hand tools. In this article, we will look at the halligan — a mainstay of the fire service — and how the individual parts of the halligan impact performance.
There are many different halligans on the market, and I will cover a variety of differences in the bars out there today, allowing you to apply these principles to most if not all bars on the market. We will not be focusing on every aspect of the halligan but more on a few of the differences we find.
The purpose of this article is not to pick a favourite or declare the best. We all have our preferences and will inevitably all feel differently about each product. And, while we can modify bars to make them better suit our needs, this article is simply about bars as purchased.
To really show the differences between types of halligans let’s break down the halligan from the adz end down.
The adz: width = mechanical advantage/distance of gap
The width of the adz is important as it defines the halligan’s greatest mechanical advantage it can achieve. The standard halligan width is 2-inches, which, on a 30-inch bar, will give you a 15:1 mechanical advantage and 2-inches of spread between the jamb and door. The average exterior door is 1 ¾-inch thick, so having the 2-inches of spread will allow you to either open a weaker residential door or provide the space to get your forks in for an inward swinging door and continue your force.
Some halligans will come equipped with a wide adz. The Maxximus Rex for example has a 2 ¾-inch adz, lowering your maximum mechanically advantage approximately to an 11:1. What you lose in mechanical advantage, you gain in three-quarter inches of spread. The Maxximus Rex also has the Rex lock puller built into the adz.
Curve in the adz
The adz comes in all shapes and sizes, whether single forged or 3-piece. If the halligan’s adz sticks out past the end of the shaft it increases the chance of deflections, as the large curve decreases the striking area and moves it off centre. If the adz has too much of a curve, it will curve back and skin the door more easily before making it around behind an outward swinging door, allowing you to pry out. Too large of a curve in the adz can also result in increased pop outs of the adz when gapping an inward swinging door as it doesn’t allow for as much contact against the door as the straighter adz does.
On the other hand, the straighter the adz, the more difficult to maneuver the tool around the soffit on the jamb. Just a little bit of curve allows the adz to negotiate the jamb without digging back into the door while we hit it into position. A slight angle will also give us ample striking surface that will cause little deflection, allowing the maximum amount of the striking force to go into the tool.
The thickness of the adz comes into play as well. When we are forcing doors, the thinner the adz the easier it will be to drive it in as it will not require as much spread between door and jam.
Some halligans, such as the Pro-bar, Maxximus Rex, and both new and old Leatherhead bars, the adz tapers off to the end with no real dramatic change in thickness. Other bars such as the Partech 3-piece or Malven, bevel the adz to help create a thinner tip. Using vanadium steel instead of tool steel has given Maxximus Rex bar the ability to create a very thin adz without losing strength. Being able to taper off with minimal to no bevel is best.
When a bevel is present it can be found either on the bottom or top side of the adz. This small difference in manufacturing can make a big difference in performance.
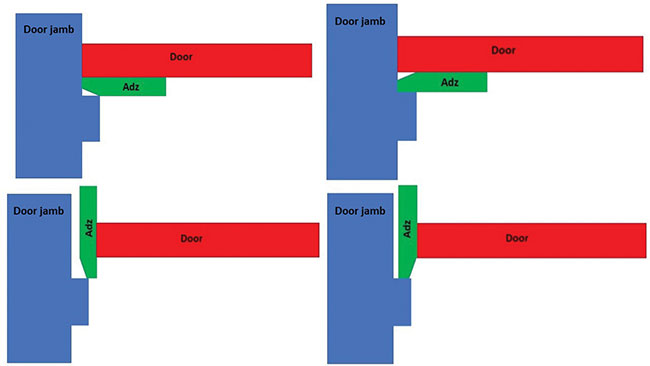
When placing the adz into the door between the soffit of the jamb and the door to use our full 15:1 mechanical advantage on an inward swinging door, the halligan sits with the top side of the adz contacting fully along the door and the underside sitting on the jamb section, which will be about a half an inch thick, depending on installation and brand of door. If our bevel is on the bottom side of the adz, it will greatly reduce the amount of already limited contact on the jamb.
When the bevel is on the top side of the tool, we reduce some of the adz surface area attached to the door, but seeing as we have a 6-inch long adz on most bars, losing a bit of contact area on the door will not be the end of the world. A bevel on the top side allows our adz to gain full contact with the door jamb, allowing us to use full force against the jamb into the door, reducing the chance of the adz popping out rather than encouraging it as a bevel on the bottom side tensd to do.
On an outward swinging door, the bevel will again play a role. If we have a bottom side bevel on the adz as we get it in around the door and past the bevel, it will be sliding like a ramp against the door, pushing it towards the door jamb and causing us to work harder to negotiate the tool into position. We will also have to get the entire adz thickness past the jamb right at the tip before we can move past it.
With the bevel on the top side of the adz we have a much thinner tip to get past the outside corner of the jamb. As the adz with a top side bevel is forced between the door and jamb, the bevel will push against the door jamb itself helping force the adz out and around into position.
The top side bevel also allows a full contact crush on an outward swinging door lessening the chance of skinning the door before you start the force.
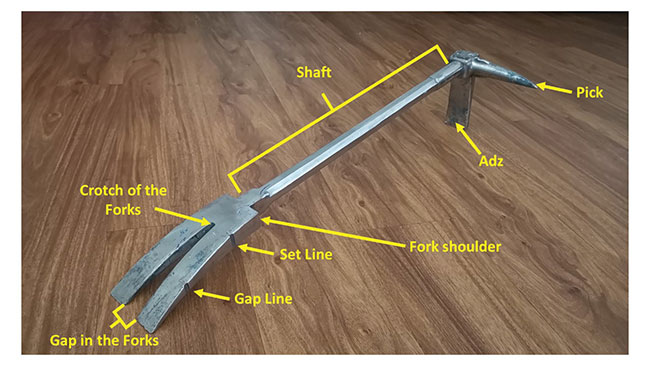
Looked at individually, the way various elements of a halligan are constructed changes the tool’s overall performance. Photo credit: Nathan Pocock
The location of the bevel on the adz makes a difference. For example, a bevel on the bottom of the adz will reduce the already limited amount of contact with the door jamb.
The pick
All the halligans have a similar shaped pick on them that is forged with the rest of the halligan. In 3-piece bars, the pick is made in one piece with the adz end, but due to being a 3 piece this piece is then connected to the shaft with a small pin, creating a weak point in the tool.
Both new and old Leatherhead Tools bars are forged adz, shaft and forks, while the pike is welded on after forging. For the new Leatherhead bars, all of these welds are strength-tested before leaving the factory.
The shaft: round, 8-sided, or 6-sided
There are three main types of shafts found on bars in the fire service: 8-sided shafts, like those found on bars by Akron, Firehooks Unlimited halligans and Malven; round ones like the 3-piece Paratech; and 6-sided shafts such as those found on Leatherhead halligans.
The round shaft can diminish grip when holding the bar. Most round shafts have machined-in grooves to help with this concern, but with gloves and wet environment these grooves may do little to aid that grip.
The 8 and 6-sided shafts provide a more secure grip because the corners of the shaft dig into your hand as you control the tool. The main differences between the 8 and 6-sided shafts is that an 8-sided shaft will have a flat surface leading down to the fork shoulders and their weight. The flat surface down to the shoulder of the forks can help when striking as it allows a larger surface area for the striking tool to ride down to the shoulder to strike it. The 6-sided shaft is a fair bit thicker, adding what feels like a fair amount of weight when directly compared, but it is by no means an overly heavy tool.
The forks
The forks of the halligan can be looked at for overall thickness. Typically, single piece bars will always have thinner forks than any 3-piece bar on the market, and variations in thickness vary from brand to brand. The thinner the fork the easier it will be for you to place the fork in-between the door and the jamb, allowing you to continue with your force. Fork thickness can change by as much as 3/4-inch between brands. Much like the bevel on the adz, some forks that are thicker will come with a bevel on the end to help with the initial entry of the tool into the door. The larger the ramp, the thicker the fork blades, the more trouble you will have with getting the bar into position.
Almost all halligan tool’s forks come with a set of shoulders. This is the part of the forks that sticks out past the edge of the shaft of the halligan. Having good strong squared off shoulders, allows for close quarters striking both in single and two firefighter forces. Large shoulders with a rounded edge will not allow for easy striking as the tool will deflect off the rounded surface. Some halligans come with hardly any shoulders at all.
The gap at the end of the forks can also be looked at as this gap can be used in a simple through the lock technique to remove door handles allowing for more passive forcible entry. Bars that come with a 1-inch or larger opening between the mouth of its forks allows you to place it down over a door handle and pry it from its collar giving you access to the mechanism. 3- piece Paratech, Probar, and Akron Bars fork gaps range anywhere from 3/8-inch to 5/8-inch gap and not wide enough to allow for this technique.
Gap and Set Lines
A common modification that members make to their halligans is simply adding a line into their adz and two lines into their forks. These lines are referred to as gap and set lines. The initial line at 1 ¾-inch in from the tip of the forks and adz shows when you have reached the backside of the door, so you do not spend time driving into the jamb or go to shallow and skin the door.
The second line on the forks if there to show you when you have driven your forks in deep enough to ensure you have enough purchase on the back side of the door. Some bars come with these lines already in place, this is referred to as a pre-tuned halligan.
Now, all halligans can be modified to some extent: gaping the forks, squaring the shoulders, smoothing out the ramps on forks and adz, etc. The point of this article was to point out some of the differences in halligans and the changes in performance they can make. It’s important we know the tools on our rigs and their every function. I hope this small look into these details encourage you to dive deeper into understanding these and other tools we use. It is only in knowing our tool’s every capability that we can troubleshoot and problem solve to the best of our abilities. The halligan has become one of the most noticeable and reliable tools in the fire service ever since its conception in 1948 by Hugh Halligan. In the right hands, these tools will open almost any door a firefighter can encounter and shave valuable time off getting into a building for search and extinguishment.
Nathan Pocock is a career firefighter in British Columbia and a member of the technical rescue team and Canada task force one HUSAR team. He is the owner and operator of Prepare4, a fire fighting training company based in Vancouver that specializes in forcible entry and rapid intervention training as well as several other areas of the fire service. He is a husband and father of two.
Print this page